

Updated on May 29, 2026
The paper describes the design, construction and working of the smart mirror. Every morning our day begins by watching ourselves at least once in mirror before leaving our homes. We interact with it psychologically to find out how we look and how our attire is. Smart Mirror or Magic Mirror is one of the applications of Raspberry Pie. A computer screen embedded in mirror looks very futuristic. The Raspberry Pie stays at back scenes and controls the data displayed on mirror. While looking at mirror you can look at various notifications from social sites as well news, weather forecast and more things. Such mirrors can be programmed to work as AI and control home appliances by voice input or touch screen. The Raspberry Pie is connected to monitor via HDMI as well as it also has inbuilt Wi-Fi and Bluetooth interfaces so we can just swipe music and videos to mirror.
Keywords: - Smart Mirror, Magic Mirror, Home Automation, Artificial Intelligence, Virtual Dressing, Raspberry Pi.
Smart mirrors are straight from science fiction. They’re part of an optimistic vision of the future that imagines a world where screens and data are everywhere, ready to feed you whatever information you need at a moment’s notice. Basically, the mirror is looks like normal mirror but when someone stand in front of it the scene changes. The mirror provides a functional, user friendly and interactive UI to its user for accessing their social sites, messengers, etc. It has widgets for displaying the current whether conditions, Time, Events, Latest news headlines The Smart Mirror would help in developing smart houses with embedded artificial intelligence, as well as finding its applications in industries. Switching home appliances becomes easy with mirror. Virtual dressing, a smart way of having trials with your fashion sense make things quite easy in malls. Having such intellectual mirror will only surge the beauty of home. The raspberry pi is programmed using python and connects to a monitor with inbuilt speaker so as to provide an onscreen interface and voice assistance as well. Section 2 focuses on Design of mirror. The working while making Smart Mirror is covered under Section 3. Section 4 comments on the Functional Overview of mirror. Section 5 covers problems and issues that may occur while development.
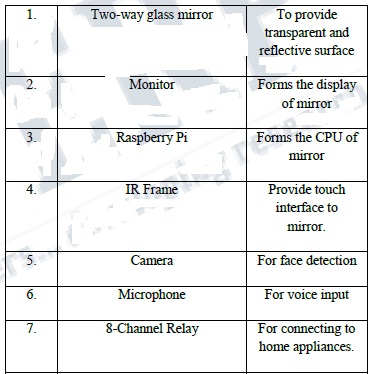
Table 1 shows basic required objects for building mirror and their functionality.
Table 1. Required Objects and their Functionality
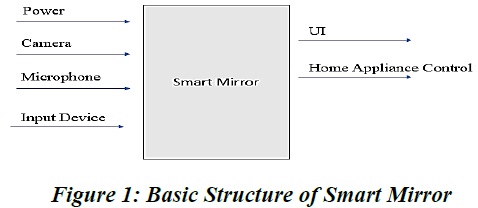
Power connection, microphone for voice input, camera for image processing forms the basic input devices for the mirror. The monitor and speakers forms the output devices of the mirror. Fig 1 depicts the basic structure of the smart mirror.
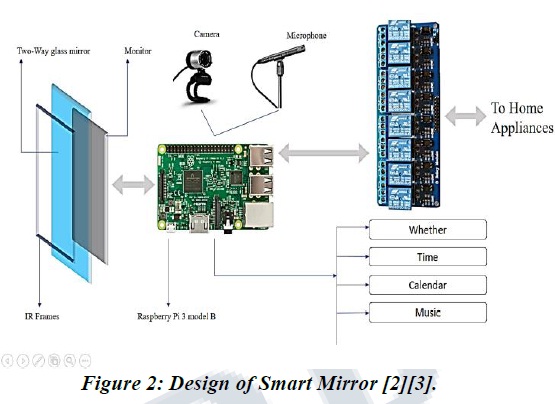
Smart Mirror doesn’t fully show the all the equipment that are to be connected to raspberry pi, but covers all major functional units. The IR frames are connected over mirror but still they work fine because it’s a co-ordinate based touch detection by the IR sensors placed at the side of frames and doesn’t require the frame to be directly having contact with monitor behind mirror. The microphone is connected via sound card on USB port of Pi. The camera can be connected to USB port or the Pi camera can be connected to camera slot on Pi. The 8-channel relay is connected to GPIO pins on Pi for controlling the home appliances. To access the internet the Pi is connected to home Wi-Fi network. The programming of the Pi for displaying the UI on the screen is done using Python, the total description of how coding is implemented is described in Section 3 of the document.
The working of each components in smart mirror is explained in this section. Let’s talk about them one by one:
The two-way mirror is what gives the mirror its real identity. It’s really magic mirror as it has reflective surface at one side and also its transparent for light with good intensity. The mirror stays at the front where the user can watch himself/herself in the mirror at the same time the allows the light from monitor to pass through it and make available the UI [4] [5].
The monitor is directly connected to Raspberry Pi via HDMI interface thus providing display as well as voice output. For providing touch ability to monitor IR frames are used which are explained further in next sub-section.
While research on internet we didn’t found any sign of how to give the mirror touch ability, so we found a way ourselves to do so. The IR-frames provides the touch interface to the smart mirror. The IR -Frames has IR sensors on its siding and connect to Pi via USB interface. Thus making smart mirror touchable[6].
The raspberry pi is the most vital part of the mirror, it forms the processing unit of the mirror. The Pi is like motherboard having all the required constituents which forms a great CPU. Its size of a credit card and still it can perform like a full-fledged computer. The programming of Pi is done using Python language. The programs can be first developed and compiled on windows or any other platform and then can run on Pi. The Pi also has its own inbuilt IDE to program in languages like C++, Python, C, Java, etc. Installation of OS on Raspberry Pi is quite a simple process. First you have to download NOOBS along with Raspbian which is great OS of Raspberry Pi for beginners. The Raspbian is just a flavor of Debian OS [7]. There are many IDEs available to do programming for Python but what we found was PyCharm Community is free and good among them who serves our requirements [8]. QtDesigner is amazing tool to make UI of Python [9]. Figure 3 shows a fully functional calculator wrote in Python script. The GPIO pins on Raspberry Pi controls the 8-Channel relay which is explained in next sub-section 3.4. The Raspberry Pi has inbuilt Wi-fi and Bluetooth for connectivity purpose as well as it allows 4 USB devices to be plugged in. Figure 3: Functional Calculator wrote in Python script
The 8-Channel relay connects directly to high voltage input source of power and low power GPIO pins on Raspberry Pi. The GPIO pins cannot control the Home appliances directly as they have very less output power that is about 5V, So we require 8-Channel relay circuit board which close the circuit of home appliances when given a high of 5V [10].
The Camera is input device for the mirror, its used for face recognition as well as body recognition. A concept called Virtual Dressing can be implemented using Image Processing. We roam in malls in search of various clothes, we cannot practically try all dressings that we like. So Virtual sorts this problem out, Images of this clothing’s are saved in memory of mirror, whenever user stands in front of mirror and selects the dress, the mirror fits the dress on our body reflection in mirror. So, no need for doing trials every time. Face Recognition based authentication is another use of the camera, it customizes the profile of different users on same mirror.
The microphone is used to give voice input to the mirror. Along with touch capability a voice input makes the system very reliable and robust in working. A sensitive microphone takes voice command from the user and processes it to do corresponding action.
On start after giving power supply to mirror the raspberry loads the OS and directly runs the UI of the mirror, it may take while to load the weather and other internet based widgets to display the information completely depending on the speed of the home Wi-Fi network. A power saving mode is also provided to the mirror by attaching a ultrasonic range detector sensor on the top of the mirror. The ultrasonic sensor activates the mirror and awakes it when someone comes close enough. Thus, improving the functionality and power efficiency of the system. On fully loading the information required the mirror now shows notification from different social sites as per the user has logged in. The events are loaded from calendar and reminded to the user.
The user can plan route to his destination before leaving home on the mirror. A mass of entertainment is also loaded on the mirror, as its connected to home Wi-Fi YouTube can be completely streamed on it and a music app is preloaded to beat your favorite music directly. Besides several other applications like gallery is also installed to view your pictures on mirror. The has a greeting pane which automatically prints greeting message according to events and time of the day. You can book a cab before leaving home using Uber cab booking interface made using Uber public API. Not only that, a user who knows the working of system well can extend the ability of the system by adding more feature to it. The Home automation embedded in this mirror is very easy to use, as you have to simply connect the pins of the appliances to mirror’s slots and then you can enjoy the control of appliances by touch interface.
While starting the project we cannot contribute all money that’s required for buying a monitor and a Pi at same time so solution was to connect the Pi to laptop using LAN or WLAN. When we tried to connect the Raspberry Pi over network using SSH on putty software it continuously gave error for not able to connect to Pi. We solved that error by manually creating a ssh file on boot drive of the pi [11]. A problem with Two-way mirror was that it crashed whenever we tried to cut it, but after surfing over internet we found solution to that problem that sticking a tape before cutting it helps. The next big issue was providing a touch interface to mirror, there isn’t a sign of how to give the smart mirror touch ability, we found solution to that problem after looking at IR Frames on the internet.
[1] The table structure is referred from http://edge.rit.edu /edge /C16103 /public /smart %20Mirror %3Apublic /FinalProjectReport.pdf
[2] The 8 Channel Relay image is taken from https://www.google.co.in/url?sa=i&rct=j&q=&esrc=s&sour ce=images&cd=&cad=rja&uact=8&ved=0ahUKEwia3P7gh cXWAhUGrI8KHdDuAj8QjB0IBg&url=http%3A%2F%2F www.fournutsbynature.com%2Fda1e8b-8-channel-relay module-quick shopping &psig=AFQjCNEVf0fzlm MCLcnezUqBUa3oaMw3CA & ust=1506590661401290
[3] The Raspberry Pi image is taken from https://www.google.co.in/url?sa=i&rct=j&q=&esrc=s&sour ce=images&cd=&cad=rja&uact=8&ved=0ahUKEwiuioDij MXWAhVFP48KHb5YA5oQjB0IBg&url=https%3A%2F% 2Fen.wikipedia.org%2Fwiki%2FRaspberry_Pi&psig=AFQj CNGLl3GJ w9 Dp0spDLgwA5x gth44Xw & ust = 1506592549201759
| Are you interested in this topic.Then mail to us immediately to get the full report.
email :- contactv2@gmail.com |
