


Published on Nov 30, 2023
The primary aim of the project is to learn about interfacing external peripherals such as sensors and motors, to a microcontroller and program it to behave in an expected manner, based on the information collected. This is done by designing a wall following robot which collects information from its IR sensors and outputs information to the motors which drive the robot.
The main task of the robot is to move parallel to a wall and at the same time avoid any kind of collision with the wall. It is however necessary to design some interfacing circuits to drive the motors and to receive data from the sensors in a way that the microcontroller would understand.
The project may be divided into three main parts. Each of these parts will then be explained in detail.
• Robot Hardware (Body)
• Interface Circuitry
• Algorithm/Program
• Robot Hardware:
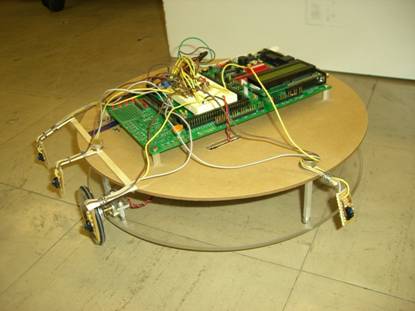
The robot's body was constructed using two hard plastic sheets which were cut into circular plates. The two plates where then mounted on top of each other using stand-off's, creating gap in between them, which was used to mount the battery. Two motors with gear box were used to drive the robot using a differential wheel arrangement. The wheels were mounted on the gear box and then entire assembly was fixed on the lower plate.
The HCS12 evaluation board was mounted on the top plate and all circuits were designed on the prototype board provided along with the evaluation board. Three sensors were mounted on the right hand side of the top plate, which would help in following the right wall and one sensor was mounted in the front to detect a wall in the front.
A picture of the robot is shown in Figure.
The interface circuitry was required in order to control high current hardware (such as motor) using the microcontroller and to understand the signals given out by the IR sensor. The two main circuits used are,
Motor Driver Circuit:
The motor driver circuit was used to act as a buffer between the microcontroller port and the high current motors. The IC used as a motor driver is L293D. The pin diagram of the IC along with the connections is shown in Fig 3. The digital control signal provided by HCS12 does not deliver sufficient current to drive the motor. Hence, a driver circuit, which is capable of changing the direction of motor using the logic signals and is capable of being driven at high current, is used. The IC is capable of driving motor with voltage up to 36V
