Samsung Galaxy S24 / Galaxy S24 Ultra – Activate / Set Up Device
If you need to transfer contacts and media from one device to another, follow these step-by-step instructions before activating your new Galaxy S24 / Galaxy S24+ / Galaxy S24 Ultra.
Your Galaxy S24 / Galaxy S24+ / Galaxy S24 Ultra:
-
will ship without a physical SIM card and is recommended to be activated with an eSIM (embedded SIM card).
If activating using eSIM, a Wi-Fi network is required. -
can activate cellular service using an eSIM or physical SIM.
If performing first time (out-of-the-box) setup and a physical SIM card is preferred, ensure: -
you’re in a Verizon coverage area.
-
a 5G SIM card is inserted then select the SIM as the default cellular data number after setup is complete.
Also Read : www.crunchyroll.com/activate Xbox
Activate / Set Up Device
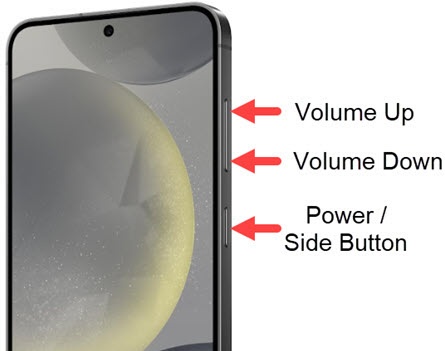
1. If powered off, press and hold the Power button (on the right edge; below Volume buttons) until the Samsung Galaxy screen appears then release.
2. Select the appropriate language then tap the Start icon.
3. To continue, review the ‘Terms and Conditions’ screen then tap Agree.
4. From the ‘Easy setup with another device’, tap Set up manually.
5. From the ‘Choose a Wi-Fi network’ screen, select a network then enter the password. Tap Skip to add Wi-Fi networks after setup is complete.
6. If prompted, from the ‘Connect to a mobile network’ screen, tap Search for mobile plans.
Allow a few minutes for activation.
Tap Set up later in Settings to add an eSIM Profile after setup is complete.
7. From the ‘Phone Activation’ screen, tap Next.
If prompted, enter the account PIN then follow the onscreen prompts (see Account PIN FAQs for additional info).
If activating a new phone, ensure the old phone is powered off.
8. From the ‘Copy apps & data’ screen, select the preferred option:
-
Next
-
Don’t copy
9. Sign in to your existing Google™ account or create a new one.
–>Tap Skip to add your Google account after setup is complete.
-
I will be using this device
-
My child will be using this device
11. From the ‘Google Terms of Service’ screen tap I agree.
12.From the ‘Google Services’ screen, select any of the following to turn on ![]() or off
or off ![]() then tap Accept:
then tap Accept:
-
Use basic device backup
-
Use location
-
Allow scanning
-
Send usage and diagnostic data
13. From the ‘Protect your phone’ screen, tap an option.
–>Tap Skip to enable a screen lock or set up face or fingerprint recognition after setup is complete.
14. From the ‘Hey Google’ screen, tap I agree to set up Voice Match.
–>Tap Skip to bypass this step.
15. From the ‘Access your Assistant without unlocking your device’ screen, tap I agree to set up Google Assistant.
–>Tap Skip to bypass this step.
16. From the ‘Verizon Services’ screen, turn the following on or off then tap Accept.
17. From the ‘Verizon Cloud’ screen, review the info then tap Accept.
–>Tap Skip to set up Verizon Cloud after setup is complete.
18. From the ‘Verizon Digital Secure’ screen, tap Accept.
–>Tap Skip to change permissions after the setup is complete.
19. From the ‘Samsung account’ screen, sign in to your existing account or tap ‘Forgot password or don’t have an account?’ to create an account.
–>To add a Samsung account after setup is complete, tap ‘Forgot password or don’t have an account?’ then tap ‘Set up later in Settings’
20. From the ‘Samsung service legal information’ screen, review the options then tap Agree
21. From the ‘Samsung service permissions’ screen, tap the applicable switch(es) to turn the available options on or off then tap Agree.
22. From the ‘Choose your display mode’ screen, tap ‘Light’ or ‘Dark’ then tap Next
23. From the ‘Choose your display mode’ screen, tap ‘Light’ or ‘Dark’ then tap Next.
24. From the ‘Setup Wizard is complete’ screen, tap Done.