pd.com Join Code : https //app.peardeck.com/join
You can go to joinpd.com or app.peardeck.com/join to log in to Pear Deck. At this time, this combination can only be used by people who have a Pear Deck subscription for their whole school or district.
Connecting Pear Deck to Schoology lets you turn an event on app.peardeck.com into a homework task. Your students can join the Session right away in Schoology; they don’t need to use a Join Code or Link like they would in a normal Pear Deck show Session. Every time you answer, Schoology saves them in the Sessions page. You can also get to them from the Teacher Dashboard, which is also in Schoology.
At this time, only people who have a district or school-wide Pear Deck subscription can use this feature at app.peardeck.com. If you are interested, please check with the Pear Deck supervisor at your school or email help@peardeck.com.
Create a Pear Deck assignment
1. Open Schoology.
2. Go to Courses. You can create a new course or open an existing one.
3. On the Course page, click Add Materials and select Add File/Link/External Tool.
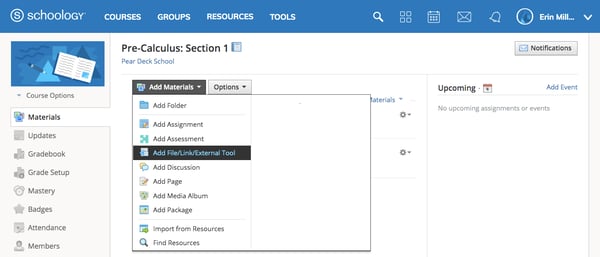
4. In the pop-up window, select External Tool.
5. In the Tool Provider section, click on the drop-down menu and select Pear Deck.
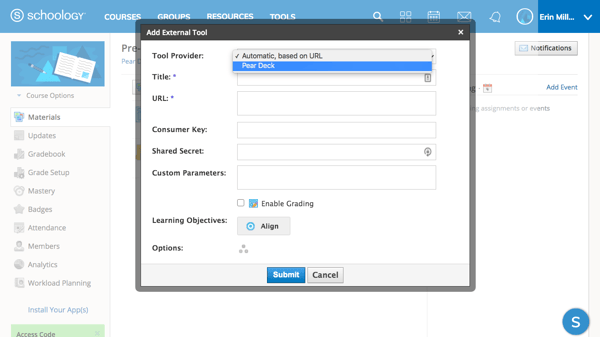
6. Customize your assignment with a Title, Parameters, Grading enablement, etc. The URL, Consumer Key, and Shared Secret have already been installed for you
7. Make sure to check the Enable Grading box if you want students to be able to click Submit Work in Schoology when they’re done with this lesson
8. Click Submit to return to the Courses page. Your assignment is now published. If you aren’t ready to continue configuring the session, you can un-publish the assignment until you have configured the session.
Start your assignment
1. Have an interactive Pear Deck for Google Slides or PowerPoint Online Slides file ready to present. The presentation files are saved automatically in your Google Drive or OneDrive and you will select the one you want to present to students in Step 5.
2. Open the Schoology Courses page.
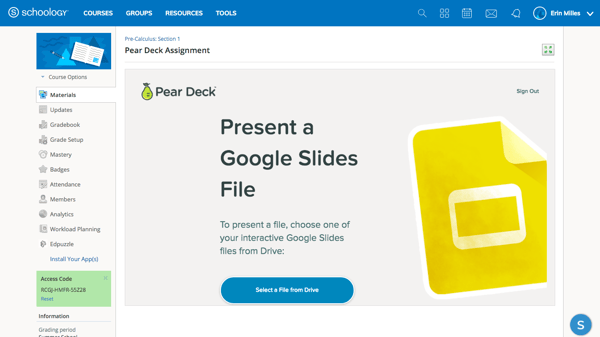
3. Click on the Pear Deck assignment you created. Note that you can give it any title when you create the assignment, but in this case I called it Pear Deck Assignment:
4. Note that the assignment is now published. You may want to use the Gear icon to un-publish the assignment while you configure the session so it does not display for your students until you are ready.
5. Click on the Select a file from Drive or OneDrive button. The first time you present a Pear Deck file in Schoology, you will be required to log into Pear Deck.
6. In the file chooser, search for and select the Google Slides or PowerPoint Online Slides file from Drive or OneDrive that you want to present to your students.
7. Choose your Lesson Mode. Depending on the Lesson Mode you choose, one of the Presenter Views (Projector or Dashboard) opens for you in Schoology.
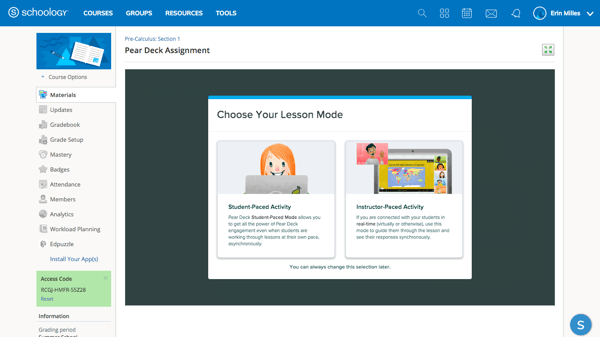
8. Student-Paced Mode (asynchronous; recommended for this integration): When you choose this Mode, the private Dashboard View opens so you can see students’ names next to their responses in real time. When students open this assignment, they get simple navigation controls on their Student View, allowing them to scroll through the slides in your presentation Session and respond to the interactive questions.
9. Instructor-Paced Mode (synchronous): When you choose this Mode, the Projector View opens and responses are anonymous by default on this View. The Student View of the slides syncs up to your slide on the Projector View, so you will need to click through the slides so students can see them and respond to interactive questions.
10. You have now created a new Pear Deck Session for your class within Schoology.
Have students complete your assignment
In order for students to “turn in” their Pear Deck assignment, the Pear Deck session must be in student-paced mode. The Student View is now available on your students’ Schoology page, so students simply:
- Log into Schoology.
- Select your course.
- Click on the Pear Deck Assignment to open the Student View of the Session. They can scroll through the slides and respond to interactive questions.
- When they reach the end, they click Submit Work to turn in the assignment.
Grade your assignment
In Schoology, you can grade assignments by completion and see the status of assignments for individual students. You can also open the Dashboard to view responses, and manually assign points in the Gradebook. You can also evaluate individual responses in Pear Deck.
In Schoology
- Open Schoology and go to Gradebook.
- In Course Options, select Grades. Use the Schoology tools to customize your grading options.
- Go back to the Courses page, and click on the Assignment to open the Teacher Dashboard. Click on the slides in the Dashboard to see the individual responses with their names (if the Projector View is open, click on the 3-dots menu to open the Dashboard in a new tab).
- You can toggle back to the Gradebook to adjust point values.
- In the Dashboard, you can leave feedback for individual students with Pear Deck Teacher Feedback.