https //mysignins.microsoft.com Security-Info : Set up your security info using the wizard
After you sign in to your work or school account at mysignins.microsoft.com, you’ll see a Security prompt that asks you to provide more information before it lets you access your account.
Security verification versus password reset authentication
Security info methods are used for both two-factor security verification and for password reset. However, not all methods can be used for both.
| Method | Used for |
| Authenticator app | Two-factor verification and password reset authentication. |
| Text messages | Two-factor verification and password reset authentication. |
| Phone calls | Two-factor verification and password reset authentication. |
| Security key | Two-factor verification and password reset authentication. |
| Email account | Password reset authentication only. You’ll need to choose a different method for two-factor verification. |
| Security questions | Password reset authentication only. You’ll need to choose a different method for two-factor verification. |
Sign in to your work or school account
After you sign in to your work or school account, you’ll see a prompt that asks you to provide more information before it lets you access your account.
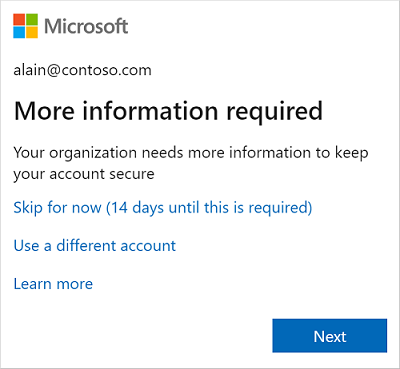
Set up your security info using the wizard
Follow these steps to set up your security info for your work or school account from the prompt.
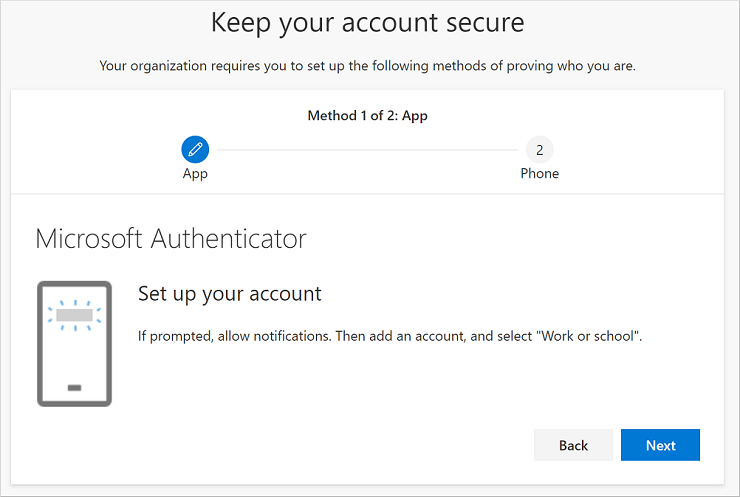
Important: This is only an example of the process. Depending on your organization’s requirements, your administrator might have set up different verification methods that you’ll need to set up during this process. For this example, we’re requiring two methods, the Microsoft Authenticator app and a mobile phone number for verification calls or text messages.
- After you select Next, a Keep your account secure wizard appears, showing the first method your administrator and organization require you to set up. For this example, it’s the Microsoft Authenticator app.
- Select Download now to download and install the Microsoft Authenticator app on your mobile device, and then select Next.

- Remain on the Set up your account page while you set up the Microsoft Authenticator app on your mobile device.
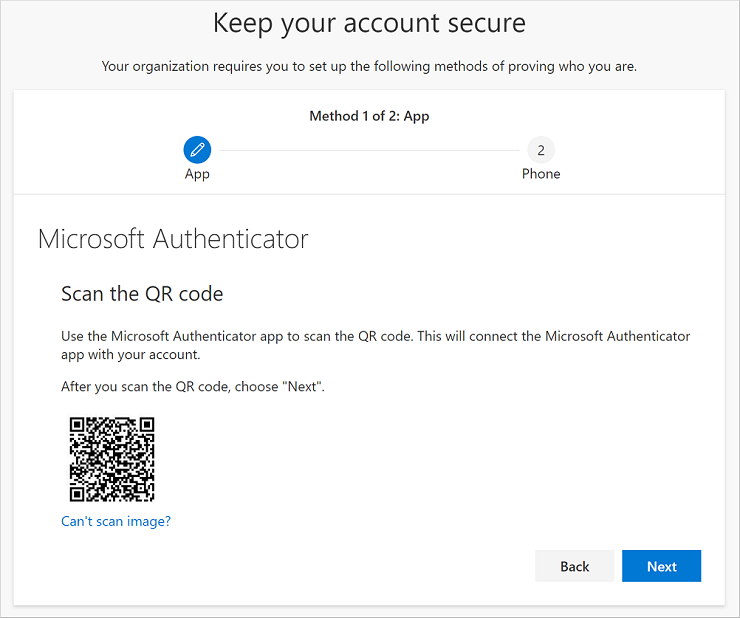
- Open the Microsoft Authenticator app, select to allow notifications (if prompted), select Add account from the Customize and control icon on the upper-right, and then select Work or school account.
Note: The first time you set up the Microsoft Authenticator app, you might receive a prompt asking whether to allow the app to access your camera (iOS) or to allow the app to take pictures and record video (Android). You must select Allow so the authenticator app can access your camera to take a picture of the QR code in the next step. If you don’t allow the camera, you can still set up the authenticator app, but you’ll need to add the code information manually. For information about how to add the code manually, see see Manually add an account to the app.
- Return to the Set up your account page on your computer, and then select Next. The Scan the QR code page appears.
- Scan the provided code with the Microsoft Authenticator app QR code reader, which appeared on your mobile device after you created your work or school account in Step 5. If the QR code reader can’t read the code, you can select the Can’t scan the QR image and manually enter the code and URL into the Microsoft Authenticator app. For more information about manually adding a code, see Manually add an account to the app.
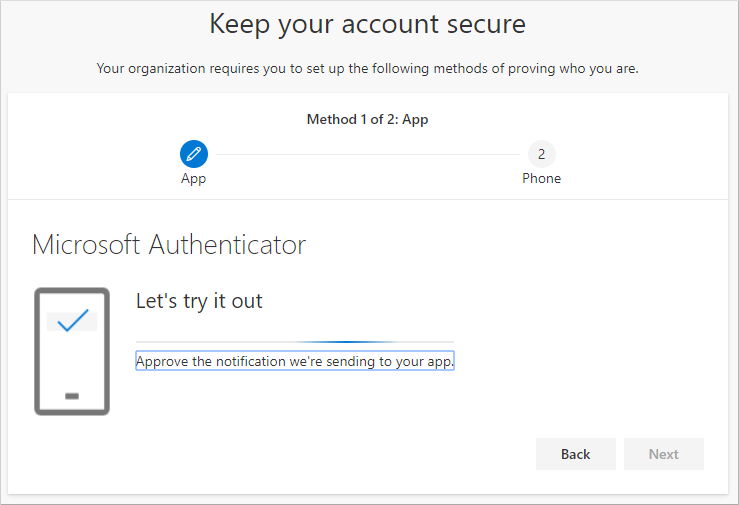
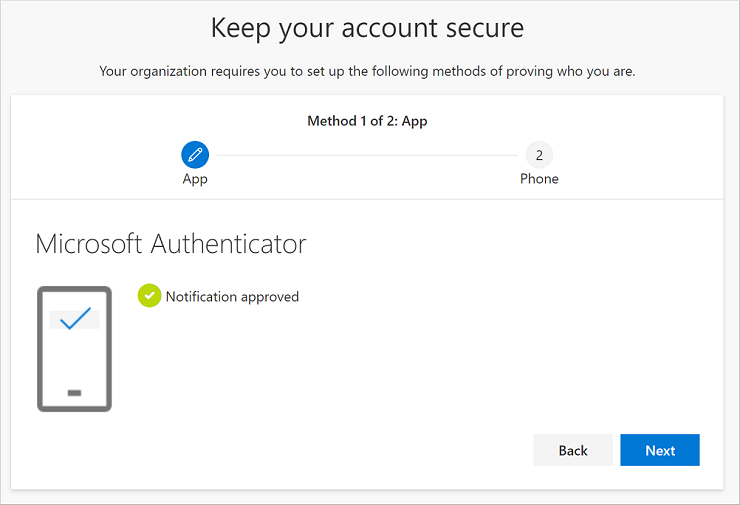
- Select Next on the Scan the QR code page on your computer. A notification is sent to the Microsoft Authenticator app on your mobile device, to test your account.
- Approve the notification in the Microsoft Authenticator app, and then select Next. Your security info is updated to use the Microsoft Authenticator app by default to verify your identity when using two-step verification or password reset.
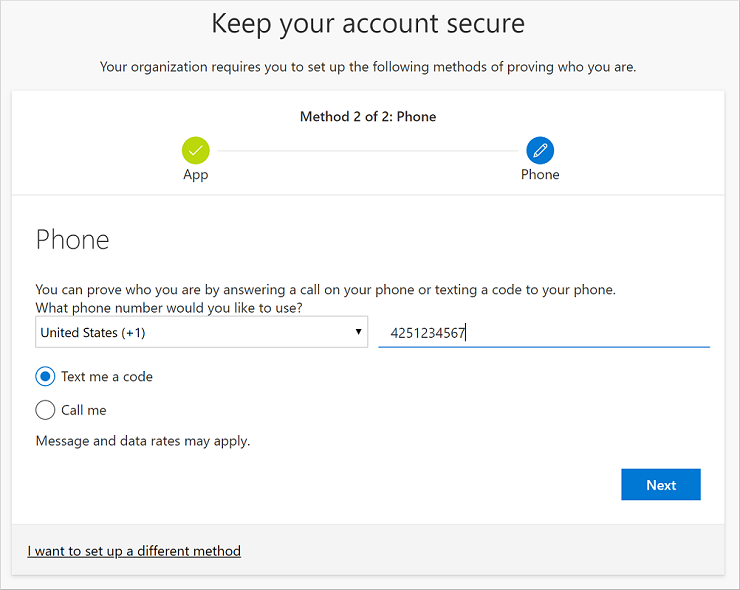
- On the Phone set up page, choose whether you want to receive a text message or a phone call, and then select Next. In this example we’re using text messages, so you must use a phone number for a device that can accept text messages. A text message is sent to your phone number. If would prefer to get a phone call, the process is similar.
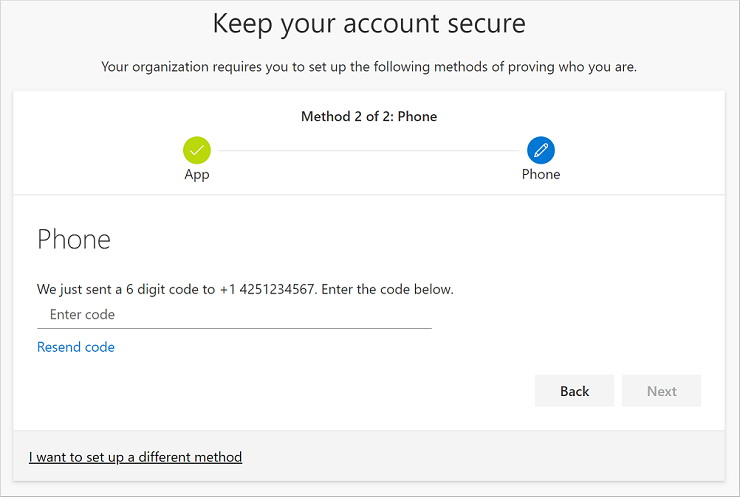
- Enter the code provided by the text message sent to your mobile device, and then select Next.
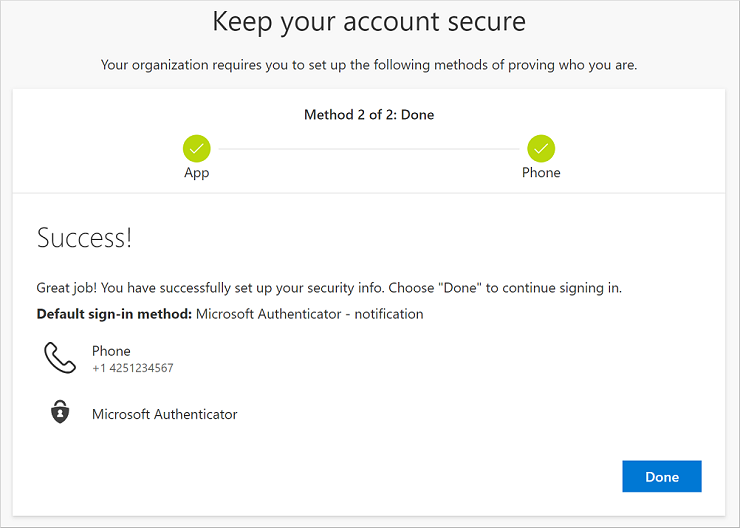
- Review the success notification, and then select Done.
- Review the Success page to verify that you’ve successfully set up both the Microsoft Authenticator app and a phone (either text message or phone call) method for your security info, and then select Done.
Manage your app passwords
Certain apps, such as Outlook 2010, don’t support two-step verification. This lack of support means that if you’re using two-step verification in your organization, the app won’t work. To get around this problem, you can create an autogenerated password to use with each non-browser app, separate from your normal password
Note: If you don’t see this option in the wizard, it means that your administrator hasn’t set it up
When using app passwords, it’s important to remember:
- App passwords are autogenerated and only entered once per app.
- There’s a limit of 40 passwords per user. If you try to create one after that limit, you’ll be prompted to delete an existing password before being allowed to create the new one.
- Use one app password per device, not per app. For example, create a single password for all the apps on your laptop, and then another single password for all the apps on your desktop.
