To create passes, login into https://create.roblox.com/dashboard/creations and Navigate to the Creator Dashboard. Passes allow you to charge a one-time Robux fee in order for players to access special privileges within an experience, such as entry to a restricted area, an in-experience avatar item, or a permanent power-up.
Here’s how to create game passes in Roblox:
1. Go to the Creator Dashboard:
- Log into your Roblox account.
- Click on the “Create” button in the top navigation bar.
- This will take you to the Roblox Creator Dashboard.
2. Select Your Experience:
- On the left side of the dashboard, under the “Experiences” section, find the game you want to create a pass for.
- Click on the game’s name to select it.
3. Navigate to the Passes Section:
- Once you’re in your experience’s page, look at the menu on the left.
- Scroll down until you find the “Associated Items” section.
- Click on “Passes.”
4. Create a New Pass:
- In the Passes section, you’ll see a button labeled “Create a Pass.” Click on this.
5. Configure Your Pass:
- Image (Optional):
- You can upload an image to represent your pass. This is recommended as it makes the pass more visually appealing
- The image should be 512×512 pixels and in .jpg, .png, or .bmp format
- Name:
- Give your pass a clear and descriptive name. This is what players will see when browsing passes.
- Description:
- Write a brief description explaining what benefits the pass provides in your game.
6. Click “Create Pass”
- Once you’ve filled in all the details, click the “Create Pass” button.
- Your pass is now created but not yet for sale.
7. Set a Price:
- Click on the newly created pass to open its details.
- In the left menu, click on “Sales.”
- Toggle the “Item for Sale” switch to on.
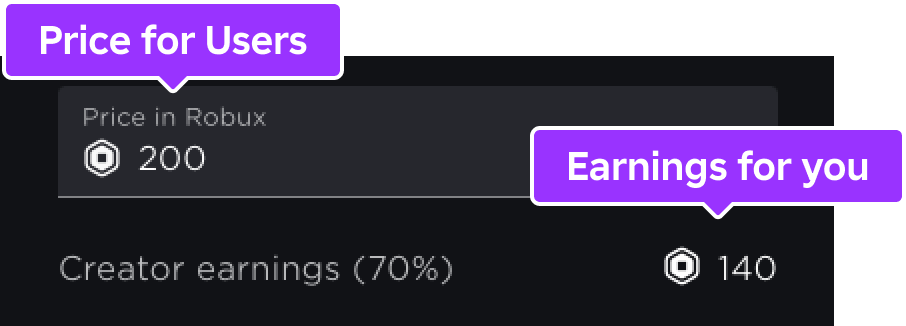
- Set the price in Robux. Remember, Roblox takes a percentage of the sale.
8. Save Changes:
- Click the “Save Changes” button to finalize the price.
Important Notes:
- Script the Pass: You need to add scripts to your game to actually give players the benefits associated with the pass when they purchase it.
- Consider the Price: Set a price that is fair for the benefits the pass provides and attractive to potential buyers.
- Promote Your Pass: Make sure players know about your pass by showcasing it in your game or on its page.
Remember, game passes are a great way to monetize your Roblox creations and give players additional content or perks within your game!
Creating Passes
When you’re creating an image to use for your Pass, consider the following requirements:
-
Use a template of 512×512 pixels.
-
Save the image in either .jpg, .png, or .bmp format.
-
Don’t include important details outside of the circular boundaries because the upload process trims and crops the final badge into a circular image.


To create a new Pass:
-
Navigate to the Creator Dashboard. All of your experiences display.
-
Click on the experience you want to create a Pass for. The experience’s Overview page displays.
-
In the left-hand navigation, select Associated Items. The Associated Items page displays for that specific experience.
-
In the horizontal navigation, select PASSES. All Passes for that experience display.
-
Click the CREATE A PASS button. The Create a Pass page displays
-
Click the UPLOAD IMAGE button. A file browser displays
-
Select the image you want to display as the icon, then click the Open button
-
Fill in the following fields:
-
Name: A title for your Pass.
-
Description: A description what a player should expect when they purchase the Pass.
-
-
Click the CREATE PASS button. The Pass displays within the Passes section of the Associated Items page.
Also Read : Pls Donate Gamepass
Locating Pass IDs
A Pass ID is the unique identifier of a Pass. You need this ID to assign the Pass a special privilege.
To locate a Pass ID:
-
Navigate to the Passes section of an experience’s Associated Items page.
-
Hover over a Pass thumbnail and click the ⋯ button. A contextual menu displays
-
Select Copy Asset ID. The Pass ID copies to your clipboard
Monetizing Passes
After you create a Pass, you can configure its settings to monetize it.
To monetize a Pass:
-
Navigate to the Passes section of an experience’s Associated Items page.
-
Hover over a Pass thumbnail and click the ⋯ button. A contextual menu displays.
-
Select Open in New Tab. The Configure Pass page displays.
-
In the left-hand navigation, select Sales.
-
Enable the Item for Sale toggle.

-
In the Price field, enter the amount of Robux you want to charge players for the Pass. The price you enter affects the amount of Robux you earn per sale.

-
Click the Save button.