How to Remove Activate Windows Watermark on your Computer?
Disabling some features and adding a watermark to the system’s bottom right corner that reads “Activate Windows – Go to settings to activate windows” is always an option. Windows 10 gives users the opportunity to download and install the operating system free of charge as a trial version.
It blocks users from customizing the operating system and installing security updates, as well as other features such as Windows Defender.
If your system isn’t activated, you will notice the watermark saying “Activate Windows” on your computer. To remove the Activate Windows watermark on a non-activated Windows 10 computer, we have written this guide.
Instructions on how to remove the “Activate Windows” watermark
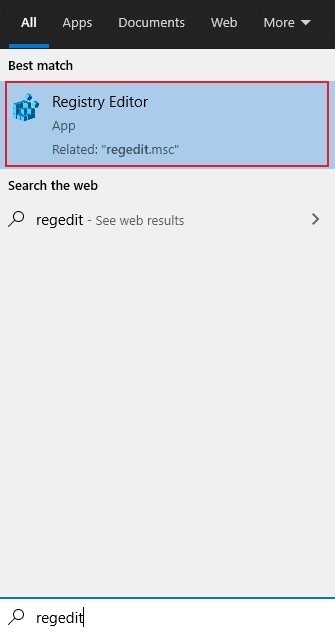
Step 1: On your Windows 10 PC, open the Registry Editor (regedit.exe). Once you’ve found the term “regedit” in the Start menu’s search results, click on the Registry Editor app from the results to open the programme.
Step 2: Go to the registry location below in the Registry Editor:
Step 3: Double-click on the “PaintDesktopVersion” item in the “Desktop” folder’s right pane.
Step 4 : Next, go to step 4 where you should change the value from “1” to “0” and click OK.
The changes will become permanent when you restart your computer.
The “Activate Windows – Go to settings to activate windows” water that used to be visible when Windows 10 restarts is no longer visible.
Buy the product key
You can always go with the product key if there are no budget constraints. The Activation tab can be found in the Settings app’s left pane. When you click the button, the app redirects you to the Microsoft Store where you can buy the product key. One important thing you must focus on is to avoid purchasing from unauthorised sellers. This is the only official method for removing the watermark activated windows uses.
Disable Windows 10 Tips
In order to do the above, all you got to perform is disable Windows 10 tips by doing the following:
- At first, head directly to the Start button and then opt for clicking the option “Settings” (This is a button, which will appear as a gear)
- Now, at this point, all you have to opt for is “System”. Now, opt for clicking the Notifications & Actions button
- Now, opt for scrolling a little down, and then all you have to opt for is turning off “Show me the Windows welcome experience after updates and Get tips, tricks and suggestions as you use windows”
- Now you are ready to go further.