


Updated on May 29, 2026
NVIDIA Tegra is a system-on-a-chip series developed by NVIDIA for mobile devices such as smart phones, personal digital assistants and mobile internet devices. Each Tegra is a "computer on a chip" which integrates the ARM architecture processor CPU, GPU, north bridge, south bridge and memory controller onto a single package.
The series emphasizes low power consumption and high performance for playing video and audio. The series is classified into three parts –APX series, 6xx series and 2xx series . The first product of 2xx series is TEGRA 250 . Here ,the initial setup of Nvidia Tegra 250 Development kit is focused .This is designed to assist a new user in understanding the hardware , selecting an operating system to install to the devkit , and connect and configure the hardware to boot that operating system .
The first product of 2xx series is TEGRA 250 .It has the following specifications :-
Processor: Dual-core ARM Cortex-A9 MPCore, up to 1 GHz
Graphics: double 3D graphics performance of Tegra 600 series
LP-DDR2 / DDR2
1080p H.264/VC-1/MPEG-4 Video Decode
1080p H.264 Video Encode
JPEG encode and decode
dual-display support
camera support
Here ,the initial setup of Nvidia Tegra 250 Development kit is focused .This is designed to assist a new user in understanding the hardware , selecting an operating system to install to the devkit , and connect and configure the hardware to boot that operating system. The developer kit contains almost all the necessary hardwares required to install the particular OS and boot it to make use .This kit is a compact , smartbook-motherboard form factor computer-on-a-board with the following specifications :
Dual ARM Cortex A9 CPU @1GHz
1GB of RAM
High-performance, shader-based 3D acceleration
HD video encode and decode
512MB of Flash memory
Onboard wired Ethernet
WiFi
Bluetooth
Analog stereo audio in/out
USB keyboard/mouse/storage support
HDMI/DVI-D and VGA/CRT display support
Onboard SD(HC) slot
Initially , the developer kit contain the following items:
Devkit main board (rectangular circuit board containing the Tegra chip and connectors for networking, USB peripherals, storage and display devices)
15V power adapter (USA 120V mains power connection)
Adjustable, folding, threaded WiFi antenna
Expansion board (smaller, square circuit board containing a serial port, LEDs and a few buttons) Items required to use the devkit, but not present in devkit :
Host PC with USB ports. The exact OS that this host PC must be running may differ depending upon the devkit OS to be used, but is most frequently Microsoft Windows.
USB mini (NOT micro, as with previous Tegra devkits) to USB cable (for device setup and connectivity)
External display supporting VGA (15-pin D-Sub), HDMI or DVI (via HDMI-to-DVI adapter)
SD card or USB-based “thumb drive” for additional storage
USB mouse
USB keyboard
Items provided by developer :
Powered USB hub
The following diagram shows a Tegra 250 devkit main board with power connected. Important connectors are annotated:
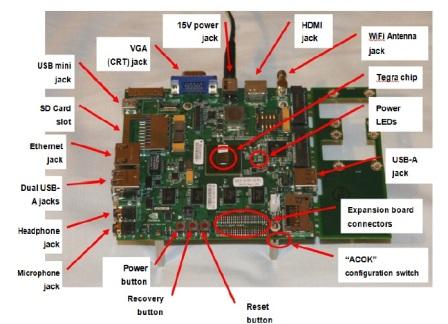
The figure above shows the nvidia tegra 250 main board. The annotated items include :-
15V Power jack. Supplies the main power to the devkit (the devkit as shipped to developers does not directly support battery power)
VGA (CRT) jack. Support for 15-pin D-Sub analog display output
HDMI jack. Support for digital display output
WiFi antenna jack. Connection point for supplied (or 3rd-party) WiFi antenna
Tegra 250 chip. The heart and soul of the Tegra 250 devkit
USB-A jacks (3). Support for common peripherals (use of a powered USB hub is strongly recommended)
Expansion board connectors. “Header” connections for an expansion board (supplied) that adds status LEDs, copies of the power, reset and recovery buttons, and a serial port.
“ACOK” configuration switch. A configuration micro-switch that is used to adjust the power behavior of the devkit. In the left (BATT) position, the AC adapter simulates a battery, and the soft power button functions normally. In the right (NORM) position, applying power causes the device to turn on, without pressing the power button. The left (BATT) position is preferred for developers.
Power button. Pressing this switch will toggle the power to the device on and off
Recovery (flashing) button. Used to place the devkit in a special mode that leaves it ready to receive a new operating system image via USB (“recovery” mode)
Reset button. Soft reset
Microphone jack. Stereo microphone input as a 1/8” phone jack
Headphone jack. Stereo headphone output as a 1/8” phone jack
Ethernet jack. Wired networking if supported by the OS
SD card slot. Supports normal and high-capacity SD card storage
USB-mini jack. USB jack for flashing the device (updating OS images) and connecting the device to a host PC.
This chapter deals with how the mini satellite board of Tegra 250 processor is connected with the Tegra main board provided with the developer kit . If the OS image requires it, the mini satellite board can be connected to the main board to add serial port and accessory switch functionalities.
The mini satellite board can be connected as follows:
Disconnect power to the main board!
Place the satellite board so that the pair of ribbon cables on the back edge of the satellite board roughly match the pair of multi-pin headers on the front edge of the main board
Connect the lower (shorter) ribbon cable to the frontmost header on the main board as shown in the following figure. Be very careful to align the pins. Minimal force should be required to insert the plug, and it should insert symmetrically:
The figure shows how the lower ribbon is connected with the frontmost header of the main board of the Tegra 250 hardware development kit .
Connect the remaining (upper, longer) ribbon cable to the rearmost of the two headers on the main board. Insertion should be similar to the previous ribbon cable
Currently, there are several packs available for use with the devkit, including OS support packs and sample application SDKs. An OS support pack must be installed (or “flashed”) to the devkit in order to boot it and use it. The set of supported packs include
An Android Éclair OS support pack. This includes scripts to install the Android OS image and associated “getting started” documentation.
A Windows CE 6.0 OS support pack. This includes a script to install the CE 6.0 operating system image onto a recovery-mode devkit as well as Khronos headers and libraries to allow developers to use Microsoft Visual Studio 2005 and 2008 to develop and debug applications on Tegra using OpenGL ES, OpenMAX, OpenKODE, etc.
An Ubuntu-based Linux OS support pack. These and other packs may be found on the Tegra developers’ website. Developers should select the target operating system that best matches their intended market, feature set and development environment requirements, as each of these operating systems differ significantly on all of these fronts. The developer website information for each OS support pack can assist in the decision. However, OS images may be re-flashed to the devkit at will, so a single devkit can change between operating systems in minutes.
Download the desired platform support pack for the OS you wish to use. At this point, one should transition away from this documentation temporarily and into the documentation supplied with the selected OS image. That documentation will, as needed, provide pointers back to this manual when it is time to connect and “flash” the device. Ensure that all of the selected OS image’s host PC prerequisites are satisfied by your selected host PC before continuing.
This chapter deals with the conclusions which arrived till now. The nvidia tegra 250 developers kit provides almost all necessary hardwares required to install that particular operating system onto the personal computer of the host and the proper booting of that operating system onto it .The items which are not provided in the developer kit is to be managed by the developer himself .He had to take decision which display he is going to use before starting the installation process . It is very easy and takes very less time to install the operating system onto the developers kit .All the steps required to be done are well documented in the nvidia tegra website .
It is the host personal computer operating system which determines which operating system are allowed to be installed onto it . Before installing any operating system on the developers kit , it should must be kept in the recovery mode . Meanwhile if there is any mistake in choosing the correct operating system , another operating system can be installed onto it but all the things are to be redone by the developer .Windows and linux on the host personal computer support windows and linux on the devkit respectively ,but if mac is going to be installed onto the developer kit , host pc can have any one of the two either windows or linux .
[1] Kit. Raúl Porcel , “NVIDIA Tegra 250 Developer Kit Hardware Introduction and setup” , Version 100113.01, NVIDIA Corporation , 2009-10-09.
[2] Eric Proof , “ IQ24_Intelligence ” ,volume 7 ,Glenn ImObersteg ,2009-11-03 .
[3] P. G. Wodehouse , “Nvidia Tegra Multi-processor Architecture” ,volume 1, White paper ,2010-01-08 .
| Are you interested in this topic.Then mail to us immediately to get the full report.
email :- contactv2@gmail.com |
